1. How to setup a SPADE-Ready Prosody Server on Ubuntu / Raspberry PI
1.1. Abstract
This paper presents a detailed guide for implementing an XMPP-based Chat-Server for a Mutli-Agent-System (MAS) powered by the Smart Python Agent Development Environment (SPADE) platform. Assuming that a reader has little to no prior knowledge of server communication, ports or XMPP, this paper will provide a more in depth, beginner friendly step by step guide. It aspires to be an up to date and thorough guide for developers and beginners who would like to set up their own MAS or develop a private chat-environment on they own server.
Please note that only the Ubuntu- Server version 22.04 is mentioned here, however the regular Ubuntu 22.04 will also be sufficient. For setting up a server, the more lightweight server variant is recommended due to being more resource efficient (using less computing power because of lack of User Interface etc.).
1.2. Requirements
A machine with access to the internet that is able to run Linux.
In this case a RaspberryPi 4 with 4GB of Ram was used, but even less powerful minicomputers will be enough as XMPP and Prosody are very lightweight
Using a RaspberryPi requires a SD-Card reader to install the operating system (if not already installed)
Keyboard
Monitor
Access to the control page of your personal router (a FritzBox is used for this paper)
Every router comes with an internal control page, that can be accessed through any browser of a machine connected to the network of the router. The process of accessing the router page can differ from one to another. Most models contain the website to enter the page in their instructions or on the back of the router itself.
Access to a valid E-Mail adress
1.3. Setup
If you already have a machine with Ubuntu Server 22.04 running, you can skip step 1.3.1 and directly go to 1.3.2.
1.3.1. Download and install Ubuntu Server 22.04 on Raspberry Pi
If not installed already, download the Imager-Software from the official RaspberryPi website.
Next plugin the SD-Card to your computer.
For the installation-process, you can find a great tutorial here
1.3.2. Update Server
Once the installation process is completed, navigate to the Ubuntu- Server command line and make sure that all the packages are up-to-date by running following command:
sudo apt update
sudo apt upgrade
1.4. Installation NGINX
To ensure we can later generate certificates as a server we use NGINX (APACHE would also work) on the machine with running the given command in the terminal:
sudo apt install nginx -y
The installation is complete for now. Check whether NGINX is runnning with the command
sudo systemctl status nginx
The following output should be visible:
ubuntu@ubuntu:~$ sudo systemctl status nginx

● nginx.service - A high performance web server and a reverse proxy server

        Loaded: loaded (/lib/systemd/system/nginx.service; enabled; vendor preset: enabled)

        Active: active (running) since Thu 2022\-08\-11 11:07:45 UTC; 5 days ago

        Docs: man:nginx(8)

Main PID: 869 (nginx)

        Tasks: 5 (limit: 4429)

        Memory: 13.3M

                CPU: 239ms

        CGroup: /system.slice/nginx.service

                        ├─869 "nginx: master process /usr/sbin/nginx \-g daemon on; master\_process on;"

                        ├─870 "nginx: worker process" "" "" "" "" "" "" "" "" "" "" "" "" "" "" "" "" "" "" "" "" "" "" "" "" "" "" ""

                        ├─871 "nginx: worker process" "" "" "" "" "" "" "" "" "" "" "" "" "" "" "" "" "" "" "" "" "" "" "" "" "" "" ""

                        ├─872 "nginx: worker process" "" "" "" "" "" "" "" "" "" "" "" "" "" "" "" "" "" "" "" "" "" "" "" "" "" "" ""

                        └─873 "nginx: worker process" "" "" "" "" "" "" "" "" "" "" "" "" "" "" "" "" "" "" "" "" "" "" "" "" "" "" ""

Aug 11 11:07:42 ubuntu systemd[1]: Starting A high performance web server and a reverse proxy server...

Aug 11 11:07:45 ubuntu systemd[1]: Started A high performance web server and a reverse proxy server.
Typing in the IP (ipv4, which can be found by using the command ifconfig in the Ubuntu terminal) address of the Raspberry Pi into any browser connected to the same network will open the starting page of NGINX:

1.5. Installation Prosody
As for any software, to install Prosody, we first update our dependencies if not already done and then install the package
sudo apt update
sudo apt install prosody
Prosody should start autmatically, which one can check with the command:
sudo systemctl status prosody
The result should be similiar to the following:
ubuntu@ubuntu:~$ sudo systemctl status prosody

● prosody.service - Prosody XMPP Server

        Loaded: loaded (/lib/systemd/system/prosody.service; enabled; vendor preset: enabled)

        Active: active (running) since Thu 2022\-08\-11 11:07:42 UTC; 4 days ago

        Docs: https://prosody.im/doc

Main PID: 810 (lua)

        Tasks: 1 (limit: 4429)

        Memory: 17.0M

                CPU: 572ms

        CGroup: /system.slice/prosody.service

                        └─810 lua /usr/bin/prosody \-F

Aug 11 11:07:42 ubuntu systemd[1]: Started Prosody XMPP Server.

Aug 16 08:10:24 ubuntu systemd[1]: Reloading Prosody XMPP Server...

Aug 16 08:10:24 ubuntu systemd[1]: Reloaded Prosody XMPP Server.
If this result shows errors, refer to the prosody log files which are generated automatically when starting, updating or generally running prosody. For more information on how to reach them, refer to Section 8: Troubleshooting.
If it’s not running, try:
sudo systemctl start prosody
Ensure that the automatic launch of prosody when booting the machineis enabled by runn ing :
sudo systemctl enable prosody
The configuration of prosody with NGINX etc. will be finalized in step 6.
1.6. Creation of a domain on no-ip.com and configuration
1.6.1. Creation of your own domain
For the server to be reached continuously and outside of the personal or private network some steps need to be taken before continuing with the setup itself.
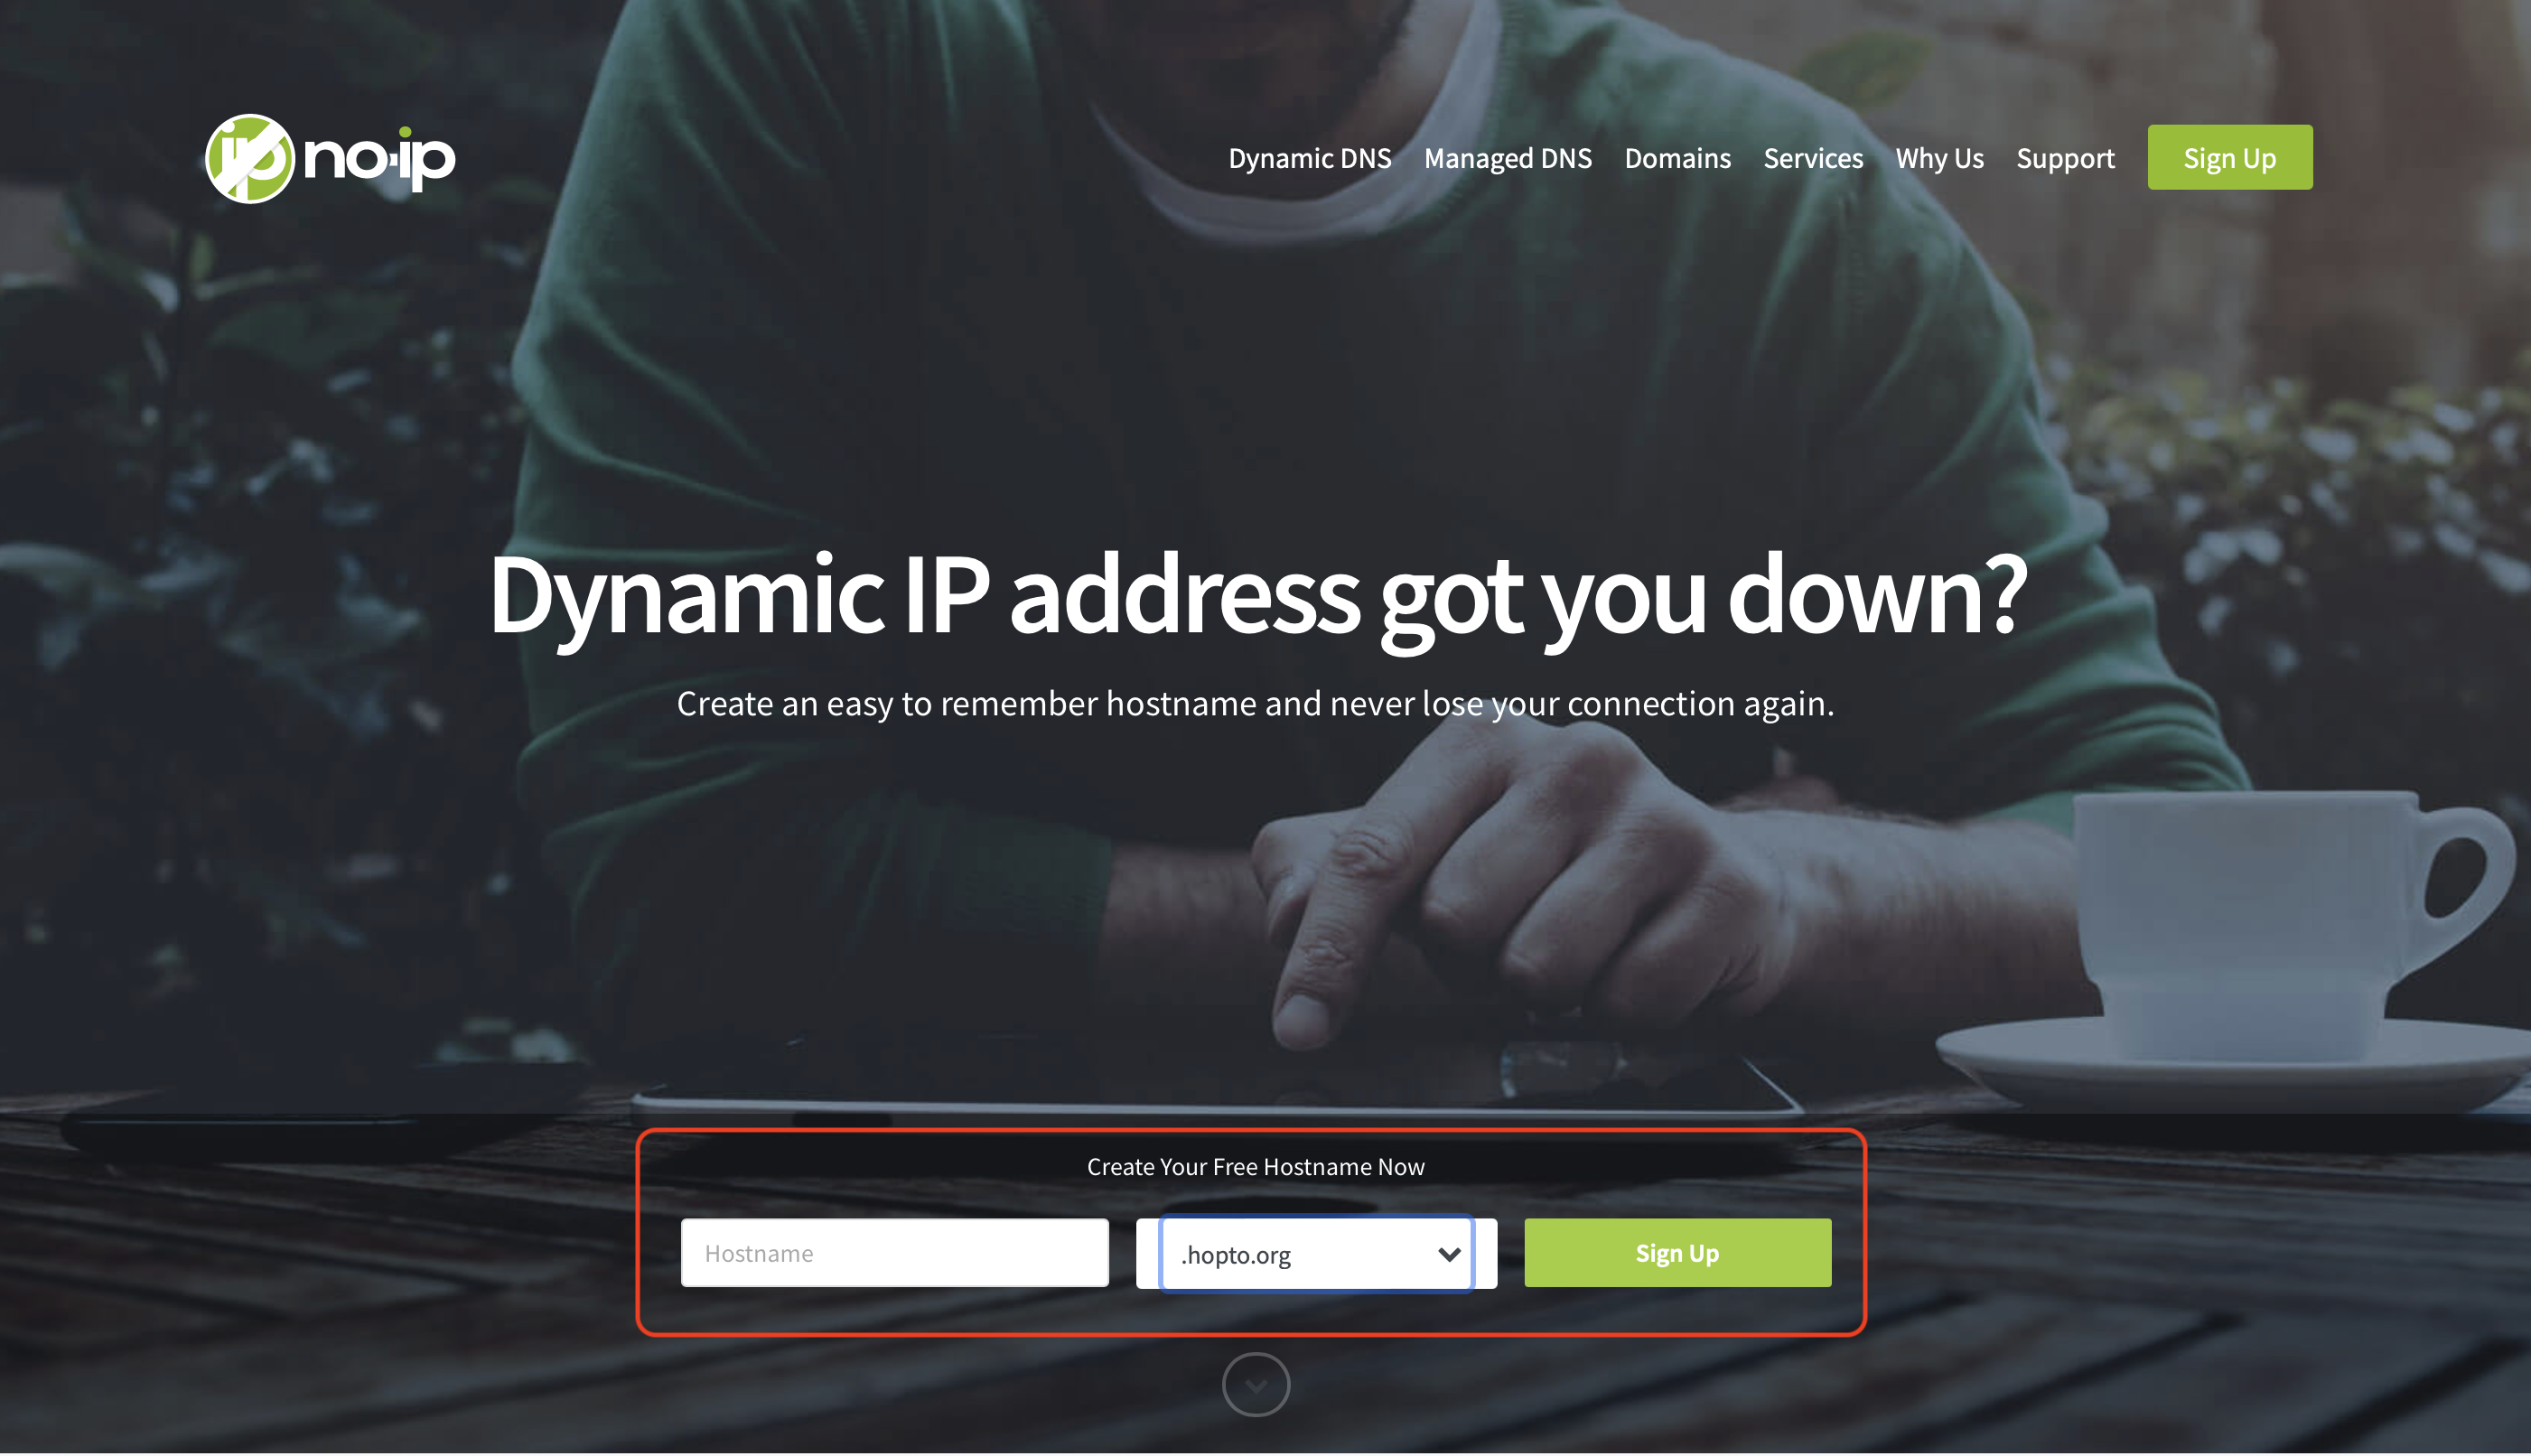
When not using static IP-addresses (by default most routers will assign them dynamically, meaning they change throughout the day) it is possible the server is not reachable under the IP it was set up under. The solution to this problem is called Dynamic DNS, which updates the route of the data to a specific server, even when its IP has changed. For this one can use the free service no-ip.com (This can be done from any Computer, best is one in the same network for the automatic IP-recognition).
Select the name you want your server to have and one of the free address-endings and klick on sign-up:

The type has to be set to A-Records which should be the default record, no-ip.com suggests. After finishing up the Sign-Up process, one can find the hostname directly on the Dash-Board or in the menu on the left: Dynamic DNS -> No-IP Hostnames.
For now, only one more thing needs to be changed on no-ip.com, which is the username. This is not assigned by default one you can see under: Account -> Account Info. Click on change username and assign a new name to the account. (This name will be important to configure our DDNS settings in the router later.)

1.6.2. Configuration of Ubuntu Server
Back at the terminal of the Ubuntu-Server 22.04, download the update-client of no-ip.com by running the command in the terminal:
wget http://www.noip.com/client/linux/noip-duc-linux.tar.gz
tar xf noip-duc-linux.tar.gz
rm noip-duc-linux.tar.gz
For structuring purposes, renaming and moving of the just downloaded folder conatining the application is recommended (in this case necessary for the next steps):
mv noip-* noip
cd noip
With
sudo make install
the noip client will be compiled and installed. During the process of installing, the client will ask for an E-Mail, password and domain. It is very important that these are exactly the same used as used to login to no-ip.org. For the purpose of this paper, an update interval of 20 minutes has been chosen.
In this case, if not already installed, the make and ggc packages have to be installed first. One can do this by simlpy running:
sudo apt install make
sudo apt install gcc
After successfully installing the client one can start it with
sudo noip2
(Highly recommended)
To automaticaly launch the client when starting the machine run
crontab -e
and add
@reboot cd /home/pi/noip && sudo noip2
Note: If the no-ip installation location is set on a different path, replace “/home/pi/noip” with that path.
In step 5, the final steps for establishing the connection between the DNS service and the no-ip client of the server are done by opening the ports.
1.7. Port-Openings in Firewall and Port-Forwarding
1.7.1. Opening the firewall ports on Ubuntu that Prosody listens to
By default, prosody listens on TCP port 5269 and 5222 of the public IP address, as can be seen with the following command. Ports can be viewed as interfaces a platform or computer has with other communicating instances e.g. other computers, networks etc.
TCP, short for Transmission Control Protocol describes the type of protocol that is used for this communication. (If the Ubuntu-version is not able to find the netstat command, it can be installed it with sudo apt install net-tools)
sudo netstat -lnptu | grep lua
If prosody is active, this command should list the ports that the service is listening for input on
which by default are 5269 and 5222.
The output should be similar to the following:
tcp        0      0 0.0.0.0:5222            0.0.0.0:*               LISTEN      810/lua

tcp        0      0 0.0.0.0:5269            0.0.0.0:*               LISTEN      810/lua

tcp6       0      0 :::5222                 :::*                    LISTEN      810/lua

tcp6       0      0 :::5269                 :::*                    LISTEN      810/lua
Opening these ports is a necessary part of establishing the communication between our server running on the machine and input from the network. This can be achieved by the following commands(The firewall should always be active when running a server!):
sudo ufw allow 5222,5269/tcp
The following command can be used to inspect all the applications using or being able to use interfaces of the firewall:
sudo ufw app list
In the current case of the RaspberryPi, the following output shows the active state of ssh access as well as the nginx service running and accessing ports:
Available applications:

Nginx Full

Nginx HTTP

Nginx HTTPS

OpenSSH
Before reloading the ufw firewall adding the rules that ALLOW this connections for NGINX and our SSH are necessary for working properly after activating the firewall.
This is done by using the ufw internal ‘allow’ command sudo ufw allow app-name for every app listed that we plan to use. e.g. sudo ufw allow Nginx Full:
sudo ufw allow app-name
for every app listed that we plan to use. e.g:
sudo ufw allow 'Nginx Full'
(with the allowance of Nginx Full, HTTP and HTTPS are enabled automatically) after this a reload the ufw firewall with
sudo ufw reload
finalises and saves the changes.
The output shows all updated rules (and their v6 versions) and the confirmation
Firewall reloaded
The command
sudo ufw enable
activates the firewall. When accessing ubuntu via ssh, the system will ask for confirmation which can be given by typing y and pressing enter. Attention: A new login with ssh may be necesary.
A check of the now allowed connections, the state of the firewall can be done by running:
sudo ufw status
For the machine used here, the output was:
ubuntu@ubuntu:~$ sudo ufw status

Status: active

To                         Action      From
--                         ------      ----
5222,5269/tcp              ALLOW       Anywhere

Nginx HTTPS                ALLOW       Anywhere

Nginx HTTP                 ALLOW       Anywhere

OpenSSH                    ALLOW       Anywhere

Nginx Full                 ALLOW       Anywhere

5222,5269/tcp (v6)         ALLOW       Anywhere (v6)

Nginx HTTPS (v6)           ALLOW       Anywhere (v6)

Nginx HTTP (v6)            ALLOW       Anywhere (v6)

OpenSSH (v6)               ALLOW       Anywhere (v6)

Nginx Full (v6)            ALLOW       Anywhere (v6)
1.7.2. Fritzbox Dyn-DNS configuration and Port-forwarding
Note: For the purpose of this paper, we used a Fritzbox 7490 router. Due to the fact, that this is an example process of the complete setup, explanations or demonstrations of different routers would go beyond the objective of this paper. If a different type of a router is used, referring to the tutorial on setting up the no-ip client on the no-ip.com website provides the needed information. The procedure of portforwarding however is similar. The interface of the routers webpage might differ strongly from brand to brand.
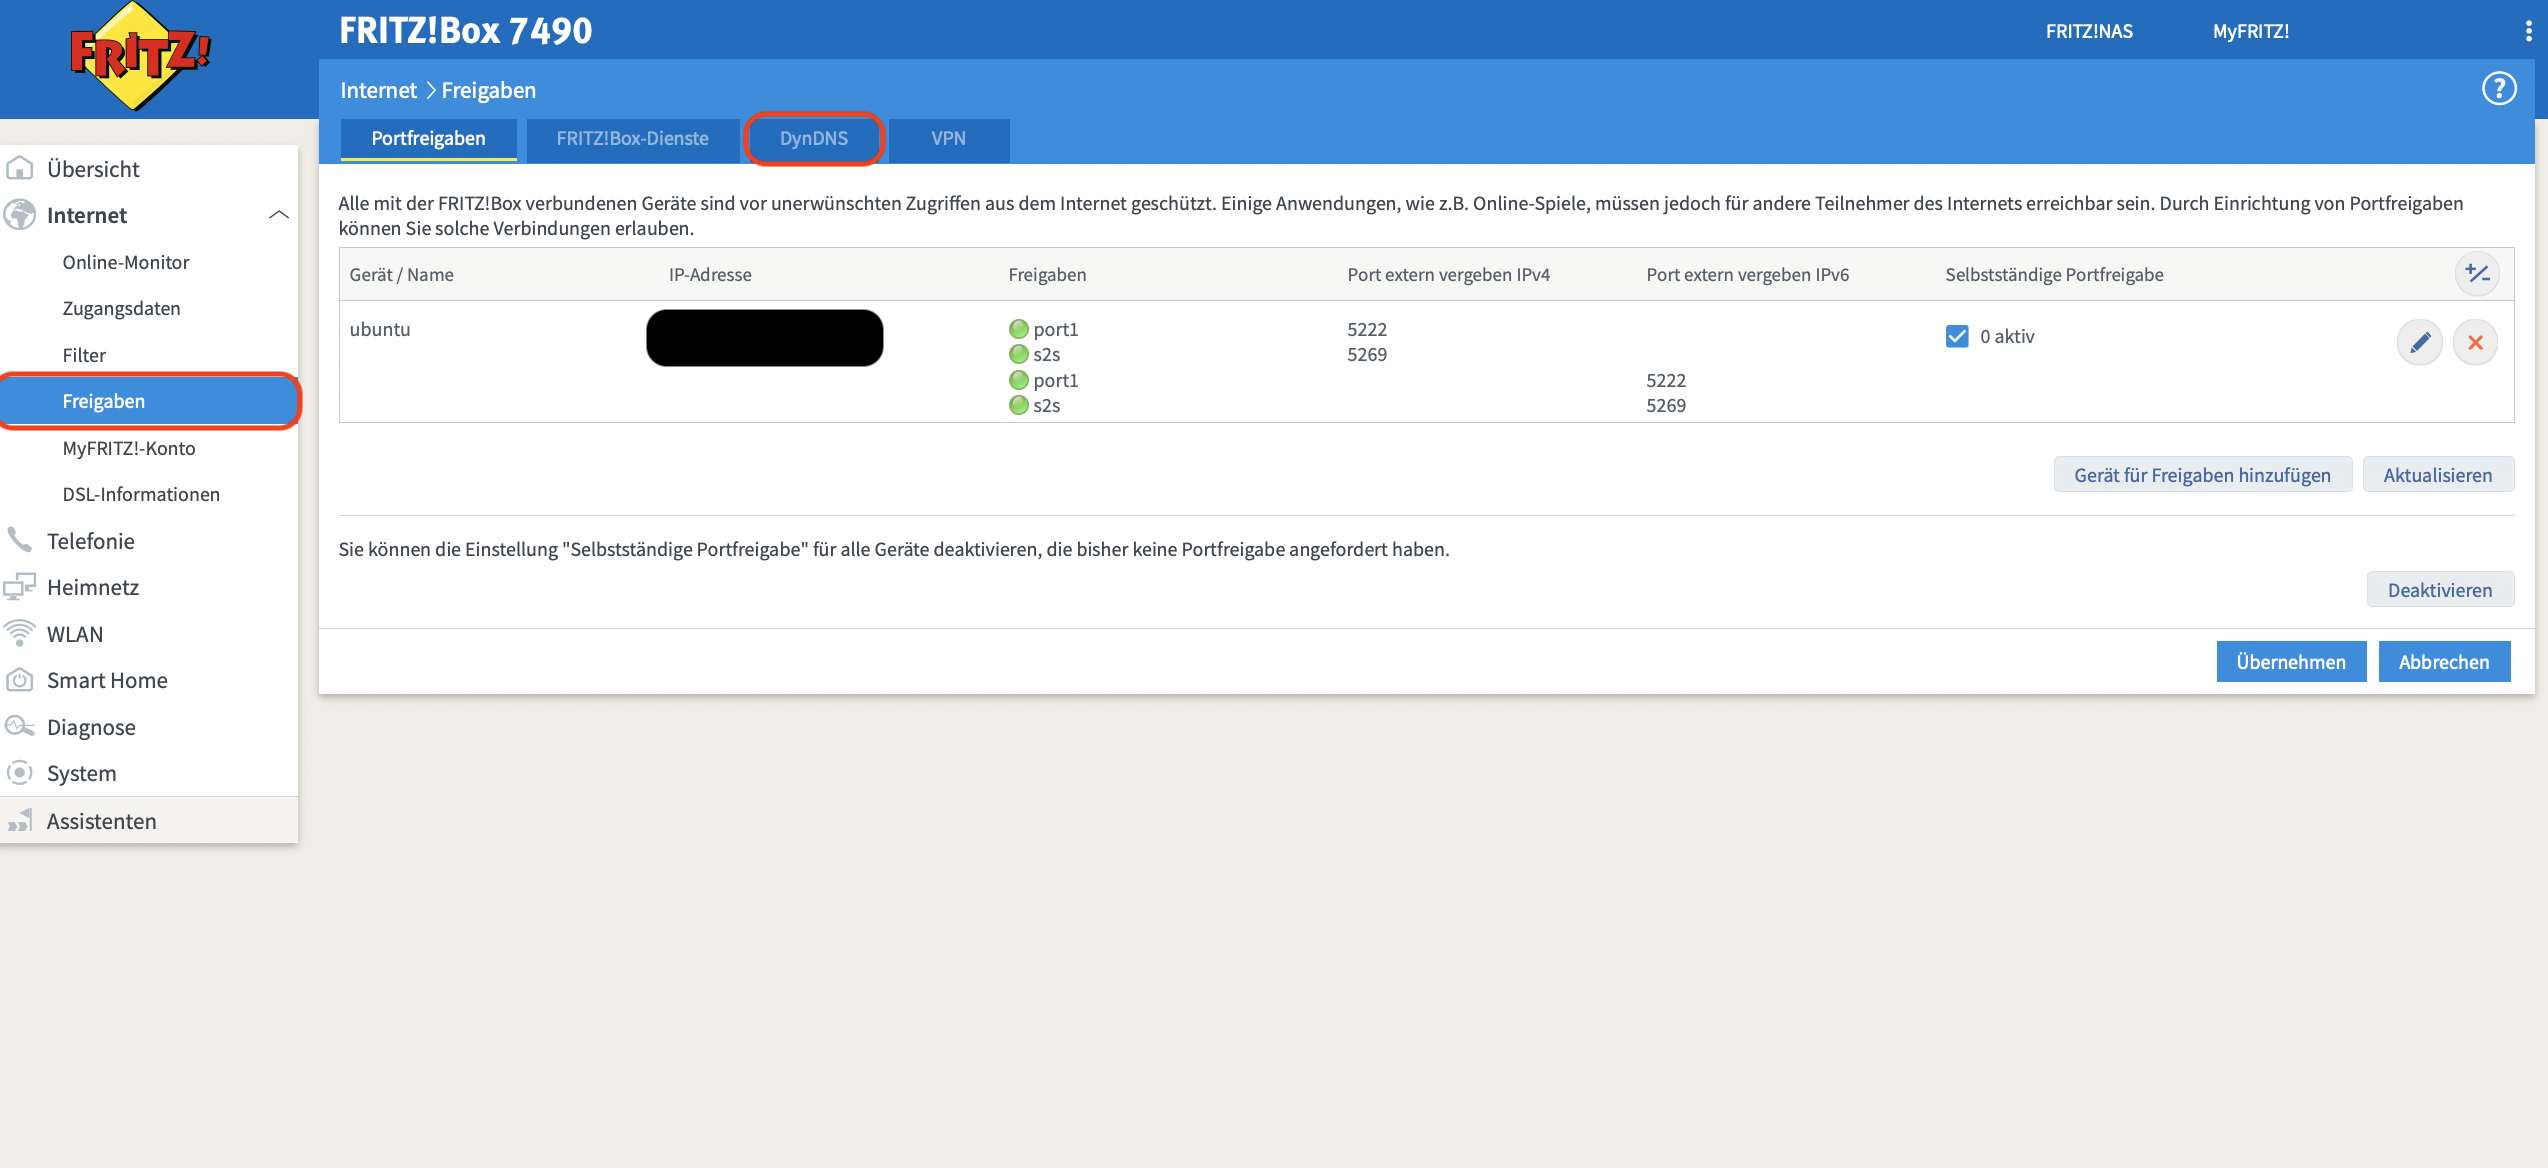
The first step is accessing the routers settings by logging into the routers admin page. Open fritz.box as address in any browser on a computer connected to the routers network and enter the password (included in the handbook of each router, or found on the back of the router). In the interface, the wanted settings can be reached by navigating through the sections Internet -> Permit Access -> DynDNS:

After ticking the box ‘use DynDNS’ in dropdown menu for provider select no-ip. and enter the username and password as well as the domain given on no-ip.com in the earlier part of the paper. Click on save changes and return to the first tab called of the menu port-forwarding:

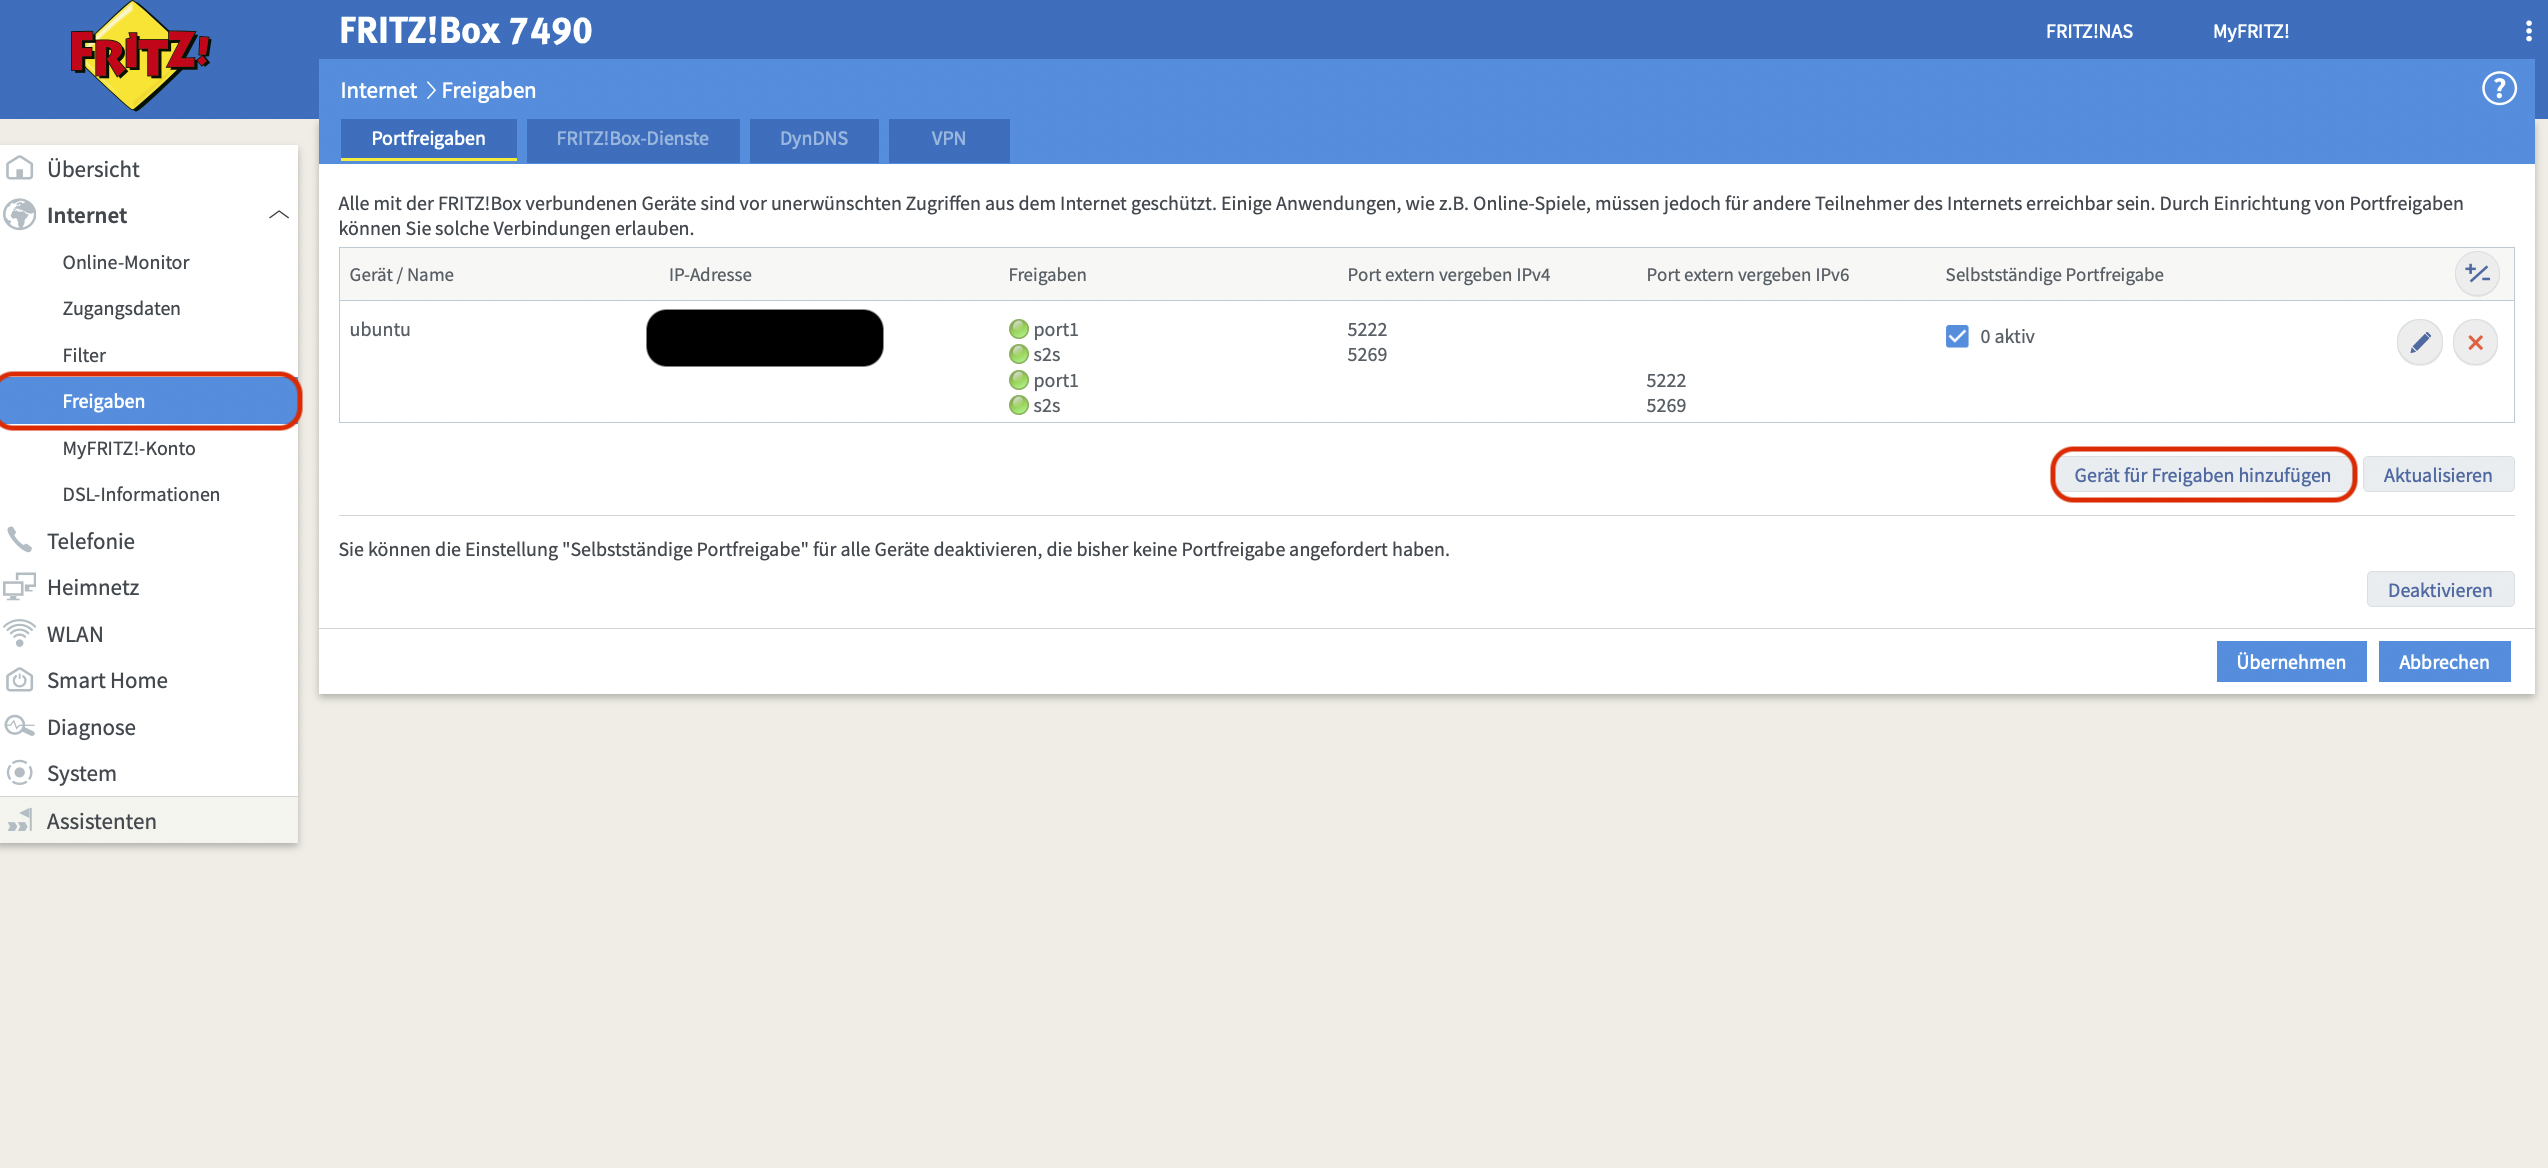
Here click on New Permit (neue Freigabe):

From the drop-down menu select the device your server is running on:

Now in the bottom right corner, click on new forward/permit.
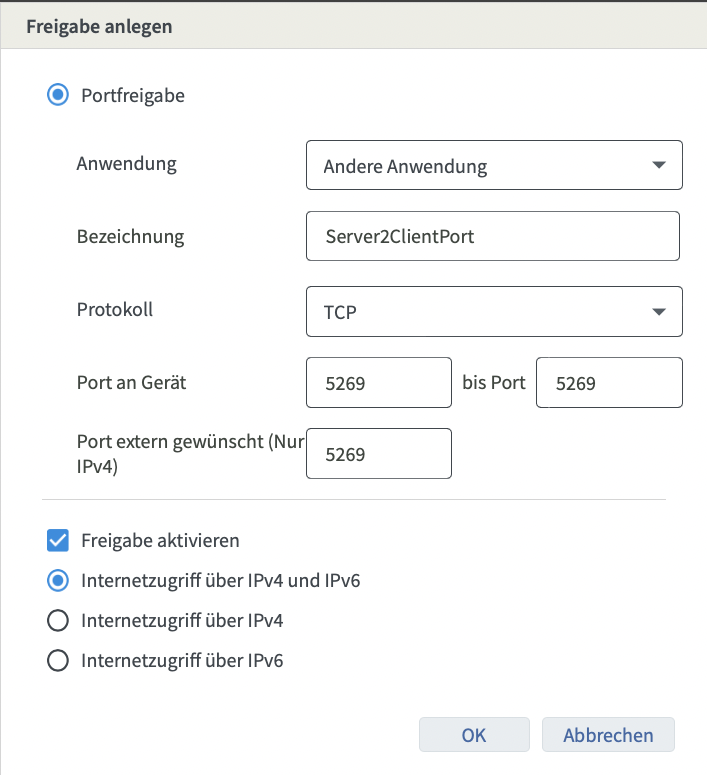
Select ‘Different Application’ in the first drop-down menu and assign a name (the name helps organize different forwards later on).
As mode, select tcp and the to be forwarded port like below:

This step is repeated 3 times for port 5269, 5222 and port 80 for the nginx-certbot to verify the certificates.
We now have to save the changes in the menu, so that we see the just added port forwardings marked with green dots.
The setup of port fowarding is finished by saving the changes (after confirming in the first window, a second confirmation in the opened window by clicking on save is necessary). The changes have been saved successfully, when the added port forwardings are marked with green dots (meaning, the rules are currently active).
With those steps the portforwarding, i.e. all traffic coming from outside the routers network, with the goal to access the ports 5269 and 5222 on our server machine are allowed by the firewall of the router and can reach the server at any time.
1.8. Certs and Final Setup Prosody
1.8.1. Configure Prosody Config File
In this step, the setup of certs for accessing the server is done to enssure secure connection for the client access. Information on what certs are:
[Explanation on Certifications](https://tldp.org/HOWTO/SSL-Certificates-HOWTO/x64.html)
The following command opens the main configuration file of prosody with the command line text editor ‘nano’:
sudo nano /etc/prosody/prosody.cfg.lua
The file already contains a lot of commented code. For now only a couple of changes are necessary, altough this file contains many possiblities for further configuration at a later point. For enabling and using other features, please refer to the documentation of Prosody as this papers focus lays on configuring a server able to connect to SPADE-Agents.
Adding or modifying the line:
allow_registration = true;
allows agents to register themselves on the server without their name being already saved in the servers storage.
This however enables everyone who has any type of XMPP-Client and your Domain to create an account and send messages, so for security reasons a serverside registration is the best solution. For using the ‘autregister’ agent feature in SPADE, this setting is necessary. Prosody only allows encrypted communication, indicated by the following two lines:
c2s*require*encryption = true

s2s*require*encryption = true
The most important change in the config file is the virtual host, linking the domain that was created on no-ip.com. The example “LocalHost” can be kept but will not be of further use in this paper. After adding the line:
VirtualHost "My-full-domain"
Saving and closing the config file finalises this step.
1.8.2. Get Certificate for Prosody with NGINX Certbot
Firstly, if not already installed, a certbot working with nginx is needed for creating the certs. Its installation can be done by running:
sudo apt install python3-certbot-nginx
After the installation is completed a new config file for our virtual host is created with the following steps:
sudo nano /etc/nginx/conf.d/prosody.conf
In the now open file paste
server {

        listen 80;

        listen [::]:80;

        server_name your-domain.com;

        root /var/www/prosody/;

        location ~ /.well-known/acme-challenge {

                allow all;

        }

}
When copying, correct indents are essential for the file to work. Your-domain.com is replaced with the earlier created domain name from no-ip, which is configured in the prosody.config file._
Save and close the file. Now we create the web directory:
sudo mkdir /var/www/prosody/
Change the ownership to www-data (nginx-user) with:
sudo chown www-data:www-data /var/www/prosody -R
Now reload to apply the changes:
sudo systemctl reload nginx
This successfully created a new virtual host for prosody with the configured domain. Now its time for the nginx-certbot to work its magic. With the next command, the Nginx-Certbot is initialized and generates the certs for the domain. Run:
sudo certbot --nginx --agree-tos --redirect --hsts --staple-ocsp --email you@example.com -d your-domain.com
Note: you@example.com and your-domain.com need to be replaced with the according mail and domain.
When successful, a confirmation/congratulation with a information on where the certs have been created and are stored will be the output of the command.
1.8.3. Install certs in prosody
Another access to the main config file is done with:
sudo nano /etc/prosody/prosody.cfg.lua
and under the virtual host that was created in step 6.1 the newly generated ssl certificates are added:
ssl = {

        key = "/etc/letsencrypt/live/your-domain.com/privkey.pem";
        certificate = "/etc/letsencrypt/live/your-domain.com/fullchain.pem";

}
Note: When copying replace your-domain.com with the actual domain name.
Save and close the file. Since Prosody XMPP server runs as the prosody user, the prosody user needs to be allowed to read the TLS certificate and key file with the following commands:
sudo apt install acl
sudo setfacl -R -m u:prosody:rx /etc/letsencrypt/
This finalised the setup of the prosody server.
The next steps are still recommended for the use of the newly created server with SPADE agents.
1.8.4. Create User and restart Prosody
Creating users by making use of the ‘prosodyctl’ command palette (this can be used to interact with the server from the command line)
sudo prosodyctl adduser newuser@your-domain.com
Prosodyctl will ask for a password for each new user created automatically.
Before using the communcation server, a last overview check can be done by running:
sudo prosdyctl check config
We receive the following confirmation, that our setup was successful and the server is runnning (In this case prosody can give a warning that auto-register is set to true because of the edited config file):
ubuntu@ubuntu:~$ sudo prosodyctl check config

Checking config...

        The following configuration files have been loaded:

        \-  /etc/prosody/prosody.cfg.lua

        Public registration is enabled on:

                your\-domain.com

                If this is intentional, review our guidelines on running a public server

                at https://prosody.im/doc/public\_servers \- otherwise, consider switching to

                invite\-based registration, which is more secure.

Done.

All checks passed, congratulations!
After passing all the checks, applying the changes with:
sudo systemctl restart prosody
saves and adds all the newly created users and settings.
Now the complete setup is done and the server should be reachable from every computer connected to the internet. A simple ‘hello-world agent’ was used for the confirmation of connectivity and successful work of this server.
1.9. Troubleshooting
The main log file for Prosody lays in the Ubuntu-system under /var/log/prosody/prosody.log. There is an error log /var/log/prosody/prosody.err. If Prosody isn’t working as expected, the error log is the first place to check for messages.
1.10. Credits
This paper was based on already existing high-quality tutorials. As to my knowledge they do not cater for complete novice to the subject, hence motivation to create step by step in depth guide. Therefore, one should view this as a selective and combined collection of steps from the following tutorials with added of more beginners friendly guidance.
The main steps are originally by:
1.11. About
Author: Tom Pieper
Contact: E-Mail: tom.pieper@dfki.de